Wednesday, May 1, 2013

Scripting VNX LUN creation with Excel

I'm currently working on putting the finishing touches on the design for a VNX 5300 (Unified) and was presented with a long list of LUN's the customer requires to be built on the new array.  On average, I'd say most of my array installs have 10-15 LUN's max so building them out by hand using the Unisphere GUI is no big deal.  But in this instance, the customer had already defined the LUN numbers and names so I thought it would be a good opportunity to figure out how to automate the LUN creation using simple Excel formulas and using the output to dump the commands into Unisphere CLI.  So, lets get to it!

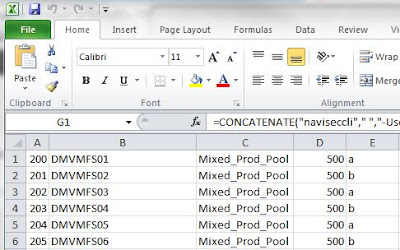
First we need our raw LUN data  In my example you'll see 5 populated columns in an Excel sheet.  Column A is the VNX LUN number (ALU), B is the LUN name, C is the VNX storage pool we want the LUN to belong to, D is the LUN size, and E is the SP we want the LUN to be owned by.  A note on column E, This column needs to be defined because in Unisphere CLI, the lun -create command makes you specify a storage processor that owns the LUN.  This is a bit different than the GUI where by default, the "auto" placement is selected by default and you don't need to explicitly set the SP.  So column E is needed so the Excel function can pull from this column to balance the LUN's evenly across both SP's.


Now that we have our LUN data in Excel, we can simply build out the formula in Excel to build out the CLI command.  I used the CONCATENATE function in excel witch basically mashes a much of text and cell data together to create my command.  Starting in column G1 I began my formula to put the command together.


And here's the exact syntax of the command in cell G1:
=CONCATENATE("naviseccli"," ","-User"," ","sysadmin"," ","-Password"," ","sysadmin"," ","-scope"," ","0"," ","-h"," ","10.114.121.102"," ","lun"," ","-create"," ","-capacity"," ",D1," ","-sq"," ","gb"," ","-poolname"," ",C1," ","-sp"," ",E1," ","-l"," ",A1," ","-name"," ",B1)

Looks like voodoo right?  Let me explain what this is doing.  The formula is taking everything inside of parentheses and putting it all together in a single "sentence".  The quotes (" ") indicate this is text and quotes with a space in between them insert a space into the output.  Notice some of the quotes are calling cells, this is where the function pulls from our raw data table.  The result of the formula (if written correctly) should look like this:


Now that we've verified the output looks exactly like the CLI command needs to, we can use the auto fill feature in Excel to copy the formula down across all the rows and it will pull the data for all the following rows and put it into the format we need.  All you need to do is highlight cell G1 and you'll notice a tiny square in the lower right hand corner of the cell.  Grab this box with your pointer and drag the box down as many rows as you need to grab all the data in the table


And once you release your mouse click after dragging, the formula will populate the rest of the rows with the appropriate data.


Finally, we need to copy the data out of Excel into Notepad.  You only need to highlight and copy the G column since this is there the formula actually lives, it will take all the text output from the column and copy to clipboard.  Paste into Notepad and it should look like this:


Now you have all the text you need to input this into Unisphere CLI and create all the LUN's defined in one single shot.  To do this, highlight and copy all the text in the notepad document and paste it into the CLI window while in the Navi CLI directory on your local machine.  Remember you'll need Unisphere CLI installed on your machine for this command to work.  That's it!

A few other notes, there are additional switches that can be included in the command to define features like Thin LUN, offset, Tiering policy, etc.  The ones I showed in my example are the basic switches needed to create a LUN using CLI.  Refer to the Command Line Interface Reference for Block document on EMC powerlink for a comprehensive list of available CLI commands.


Monday, March 18, 2013

VNX FAST VP and Storage Pool free space

FAST VP auto tiering and slice relocation is something most storage admins consider when you actually have pools that contain mixed disk types, but are often overlooked when a pool only contains one disk type where there is no option for data to move up or down.  If your array has pools that contain only a single disk type (example, only 15k SAS), FAST VP still runs it's normal tiering policies against homogeneous pools and will attempt to relocate data slices to disks in private RAID groups that less utilized than other disks in the pool.  This is done as a "load balancing" process as data ages and runs through it's normal life cycle.  More info on FAST VP load balancing can be found on page 10 of the EMC FAST VP white paper (Powerlink Login required).

I recently uncovered several slice relocation errors happening daily on a VNX 5300 with the FAST VP enabler installed.  The syntax of the errors contained "Could not complete operation Start Relocation..." The errors pointed to a homogeneous pool containing only 15k SAS drives and would occur around the same time every morning.  By default, FAST VP is scheduled to run starting at 11pm for 8 hours until 7pm.  This of course can be modified but I wouldn't advise it as relocating data on a production array should occur during off hours.  Here's an example of the SP event log error that shows relocation failures:


After lots of digging, I found a Primus article (emc274840) on EMC's support forum that indicates a storage pool with not enough free space will cause data relocation errors.  Aside from the recommendations in this Primus article, there are no other published figures (that I could find) stating how much free space to leave in a storage pool to allow for FAST VP to operate efficiently.  I verified the pool in question on my 5300 was indeed 99.9% utilized and did not have the free space needed for the data slices to be relocated within the pool by FAST VP.  In a nutshell, EMC recommends a minimum amount of free space within a FAST VP enabled pool in order for data to be relocated within the pool.  In FLARE version 30 and 31, a minimum of 10% free space should be left in the pool, unallocated by user LUN's.  In version 32 (Inyo) EMC recommends leaving 5% free in the pool for slice relocations.

If you find yourself in a situation where you are inside the minimum free space threshold for a pool and encountering relocation errors, you'll have to either use LUN migration to move LUN's out of the pool into a lesser utilized pool, or add more disks to the pool to expand the capacity.  If you happen to have LUN's in the pool that are presented to Windows 2008 or 2012 hosts, you can use the LUN shrink option to free up space in the pool as well.  LUN shrink is supported on the VNX, but will only work on Windows 2008 or 2012 host operating systems.


Wednesday, February 27, 2013

Using FC zoning in UCS 2.1(1a)

Using direct attached FC storage with UCS has been supported for a good while by Cisco and most hardware manufacturers but with one major caveat, you needed to have an MDS, Nexus, Brocade or some other FC switch upstream to house the zoning database as the fabric interconnect did not have the capability to do zoning services.  While this would work it wasn't always the most cost effective method of deploying storage to a UCS environment due to the fact that you had to utilize FC ports on the Fabric Interconnect for the front end ports on the storage array and for the fiber switches.  Not to mention the additional management overhead of additional hardware north of the fabric interconnects. This is what a typical setup would look like before we had UCSM firmware version 2.1x.


With the introduction of firmware version 2.1(1a) Cisco has introduced UCSM based FC zoning for direct connected topologies.  This eliminates the need to have an upstream switch host the FC zoning database as the zoning can be handled within the Fabric Interconnects.  It's not difficult to setup and it works great.  In my setup I have an EMC VNX 5300 and a pair of 6296 Fabric Interconnects.  Connectivity from the VNX front end storage ports to the FI's is diagrammed below:


Configuring the zoning is pretty straight forward in the UCSM and all configuration is done in the SAN tab on the UCSM.  The first step is to create your VSAN's.  I do not use the default VSAN (VSAN1) for production traffic per Cisco's best practice.  Since we have a dual Fabric Interconnect configuration, we'll configure 2 VSAN's.  Fabric Interconnect A will be VSAN 15 and Fabric Interconnect B will be VSAN 25.  You can pick any numbers want, just make sure they don't fall into the restricted range for named VSAN ID's.  Refer to the Cisco UCS Manager GUI Configuration Guide, Release 2.1 for more information on the restricted VSAN ID's.

Step 1 - Creating a VSAN in UCSM:
In the SAN tab under Storage Cloud, right click on VSANs and select Create Storage VSAN.  The following window will appear.


Repeat the process to create VSAN25.  You now have 2 VSAN's created with zoning enabled.

Step 2 - Create a Storage Connection Policy
The Storage Connection policy is what defines your storage targets within UCS.  It's simply a list of WWPN targets that the FI's will put into zones with the WWPN's of the vHBA's just like a normal FC switch.

To create a Storage Connection Policy, right click on Storage Connection Policy and select Create Storage Connection Policy.  The following window will appear.


Enter a name and description for the Storage Connection Policy.  Press the green + button on the right to enter the target and fabric information for the storage.  On the VNX, you can get the WWPN info for the SP ports from within Unisphere Manager.


Once all 4 FC front end target ports have been entered into the storage connection policy, it should look like this:


Step 3 - Create vHBA Templates
Create your vHBA Templates as you normally would in a UCS deployment.  Ensure that each HBA you create is assigned to a particular VSAN.  In this case, we're creating 2 templates.  One for fabric A and one for fabric B for redundancy and fail over.  Fabric A vHBA will be assigned to VSAN15 and Fabric B vHBA will be assigned to VSAN25.


Repeat the process for the second vHBA Template on Fabric ID B on VSAN25

Step 4 - Create Service profile Template
Create a service profile template with all other Server, LAN, and SAN policies you require for your server.  There is a section on zoning we'll focus on that requires special configuration that will mate the vHBA's in the service profile to the storage targets we specified earlier in the Storage Connection Policy.

In the storage portion of the Service Profile Template creation, it asks to create a vHBA.  I chose expert mode and created 2 vHBA's each using the 2 vHBA templates we created earlier.  I named each vHBA fc0 and fc1.  fc0 uses vHBA template A (using fabric interconnect A as it's path (VSAN15)) and fc1 uses vHBA template B (using fabric interconnet B as it's path (VSAN25)).


Next, it asks you to configure initiator group.  This is just a container that houses the 2 vHBA's we created earlier.  Here's the screen you immediately after creating the vHBA's.


Select the green + button to create a new vHBA Initator Group.  Enter a name and description.  Under Storage Connnection Policy, select the dropdown to select the policy we created earlier for the VNX_5300.


Select OK and you'll now see a new initiator group in the right hand box to which you can add the newly created vHBA's to.  You must first highlight the initiator group name on the right to enable the Add To button.  Once it's clickable you can select both fc0 and fc1 from the left box, select Add To and the vHBA's will be placed in under the initiator group.


The rest of the work is standard issue service profile template configuration going through the wizard.  Once the service profile template is associated to a server the server can be fired up and the zoning information can be viewed through the UCSM.  Under the Service Profile and for a particular server, go to the FC Zoning tab and you'll see the zones that are created inside the Fabric Interconnects.


Thursday, January 31, 2013

First Post!

I can't even begin to count how many times I've come across a solution to a mind numbing technical problem by using the super tool known as Google.  Sometimes these solutions have allowed me to finally go home after spending a long night inside a 65 degree data center and even allowed a hospital to resume admitting patients after a hard storage outage.  On the flip side, it's helped me succeed at some very complex deployments with minimal hiccups and maximum customer satisfaction.  Needless to say, I'm thankful for my technical cohorts out on the WWW who've taken the time to document problems and what they've done to fix the issues so people like me dont have to burn the midnight oil banging my head against a server dealing with the same issues.  I've decided to start making my own contributions to this great knowledge base of questions and answers.  I dont intend to break any ground with my posts, but hopefully someone out there will find them useful and I can pay it forward for all the times I got the right answer when I needed it.  And it wont all be about the 1's and 0's.  I often find myself in very interesting situations and intend to document those here as well.  I'm not shy when it comes to making fun of myself :).  Happy reading!